Accounts Payable (A/P) module
Note: Don't see this feature? Contact your sales representative to learn about our accounts payable options.
Accounts Payable (A/P) provides a variety of options that you can use to share your payment information with your accounting department or to print checks for your grant payments.
 Export to Accounts Payable (A/P)
You can use the Export to A/P option to generate export files that contain your Payment data. These files are imported into your accounting software, which is used to generate invoices and checks.
-
Search for the Payments you want to export using Quick Find, Full Search, or the Related lists. In the search results, select the checkbox next to the Payments that you want to export.
-
In the Actions bar, select Export to A/P. Choose a File format, then select Next. Select whether you want to Mark payments Paid, then choose as As of date and select Next.
-
The system automatically checks for any issues with the selected Payments, and a status displays for each Payment ID. Select or deselect the Ready, Warnings, and Errors checkboxes to show or hide records with those statuses.
-
If there are any invalid Payments, select Remove invalid payments.
-
Select Export to download an export file containing the Payment information to your computer.
For more details, see the Export to Accounts Payable learning.
Import A/P data
-
After your checks have been cut, you can export the Payment data out of your accounting system and use the Import A/P data option to import your check data back to Grantmaking. Then your Payments are updated with check info.
-
To import Payment data, on the Payments search results page, select More, then select Import A/P data. Select Choose file to browse for and select an import file from your computer.
-
If desired, select Mark Payments 'Paid', then select Next.
-
Note: If you select the checkbox, you'll need to repeat this process with payments that have not been paid.
-
Read and of any Errors or Warnings in the Result column, then select Import.
The following will be updated depending on the import file type:
Standard A/P Import file:
-
The date, time will be taken from the header lines of the import file and displayed.
-
The # of checks and total amount will be taken from the footer line of the import file and displayed.
QuickBooks A/P Import file:
-
The date range will be taken from the second header line of the import file and displayed.
-
Time will be hidden and its label suppressed.
-
The # of checks will be calculated by counting the number of transactions in the import file and displayed.
-
Total amount will be calculated from the detail section of the import file by adding up the AMOUNT fields and displaying the sum as a positive number.
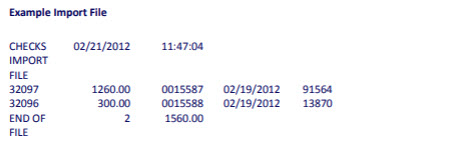
Standard A/P Import File Layout
The standard Import file consists of the following sections in a text file.
Header
The header section includes the following fields:
| Field | Description |
|---|---|
| Title | The following text: CHECKS IMPORT FILE |
| Current Date | mm/dd/yyyy. |
| Current Time | hh:mm:ss format (military time). |
Details
For each Payment, the details section includes the following fields:
| Field | Description |
|---|---|
| Payment_ID | The ID of the payment that was exported from the GIFTS Online system. |
| Payment Amount | Amount, including decimal point. |
| Check # | The check number. |
| Payment Date | mm/dd/yyyy format. |
| Organization Vendor # | If the Organization associated with a Payment does not have a Vendor Number in GIFTS Online, this optional field is used to update the Organization's Vendor Number with the number assigned by your accounting department. |
Footer
The footer section includes the following fields:
| Field | Description |
|---|---|
| Label | The following text: END OF FILE |
| Number of Payments | Total number of payments included in the file. |
| Total Payment Amount | The sum total of the amount of the payments included in the file. |
Example Import File
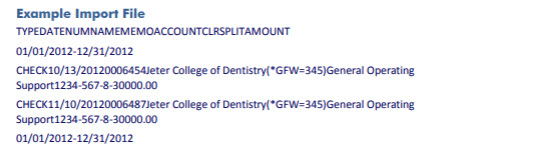
QuickBooks A/P Import File Layout
This section details the ASCII file generated by the "GIFTS Export" report that users create in QuickBooks.
The Import file consists of a two-line header section, a detail section that lists each payment on a separate line, followed by a single-line footer section. Each line in the file is separated by a CR (carriage return) and LF (line feed). The fields within each line are separated by tabs.
Header Rows
The first line of the file is a header that consists of an empty field followed by fields containing the name of each field in the transaction records. The following is the exact format of this first line:
TYPEDATENUMNAMEMEMOACCOUNTCLRSPLITAMOUNT
The second line consists of the date range selected in the QuickBooks report, followed by ten blank fields. The date range in the header is not required. The format for the range is mm/dd/yyyy-mm/dd/yyyy. The following is an example of the second line:
01/01/2023-12/31/2023
Detail Rows
For each Payment, the detail section includes the following fields:
| Field | Description | Sample Data |
|---|---|---|
| [left margin] | Blank. | |
| TYPE |
NOTE: This field is not used during import. Indicates the transaction type. |
CHECK |
| DATE | Check date, in mm/dd/yyyy format. If the Payment is marked as Paid during the import, this is imported to GIFTS Online as the Payment Date. | 01/01/2024 |
| NUM | The Check Number, which is imported into the appropriate Payment record or records. | 0006454 |
| NAME |
NOTE: This field is not used during import. The legal name of the payee Organization. If the name in GIFTS Online was longer than 40 characters, it was truncated when it was exported to QuickBooks. |
Jester College of Dentistry |
| MEMO |
NOTE: This field is only used to get the Payment ID, otherwise it is not imported. The values in this field populate based on the 'Include Payment ID in Memo Field (required for import)' setting that was set on the export dialog. If set to checked (true) - This field is preceded by "(*GFW=[Payment ID])". The Project Title of the Request with which the Payment or Payments are associated. I set to unchecked (false) this value will be blank and the records will error out. |
(*GFW=345)General Operating Support |
| ACCOUNT |
NOTE: This field is not used during import. The QuickBooks Account Number entered into the A/P Module preferences. |
1234-567-8 |
| CLR |
NOTE: This field is not used during import. Can indicate whether the check has cleared. |
|
| SPLIT |
NOTE: This field is not used during import. Identical to the ACCOUNT. |
1234-567-8 |
| AMOUNT | The Payment Amount, prefixed by a minus sign (-). For Payments grouped by Request, this is the total amount of the Payments in the group. | -30000.00 |
Footer Row
The last line is identical to the second line of the header. As with the date range in the header row, the date range is not required in the footer row but if there is a date range in the header, there must be one here as well because the two rows need to match exactly.
Example Import File
Verifying a QuickBooks Import File
When a file is selected, GIFTS Online must detect the import file type and confirm all lines in the file match the appropriate layout and that the data is correct and can be used to update the appropriate field in Payment records.
If an errors are found, a process log opens detailing each line in error.
GIFTS Online reads the first line of the import file to decide on the file format. If the first line exactly matches the QuickBooks header first line format, then import process proceeds to parse it as a QuickBooks A/P import file layout.
The QB header is specified in the QuickBooks Header Row section.
The exact text to match is below:
TYPEDATENUMNAMEMEMOACCOUNTCLRSPLITAMOUNT
If the first line does not exactly match the text above, the import process assumes a standard A/P import file format.
Produce checks
Note: You must have Check Writer enabled to use the Produce checks option.
You can use the Produce checks option to merge Payments into a check template that downloads to your computer so you can print directly to your own check stock. This feature updates Payment records with their new Paid status and a check number reference.
-
Search for the Payments you want to produce checks for using Quick Find, Full Search, or the Related lists. In the search results, select the checkbox next to the Payments that you want to produce checks for.
-
In the Actions bar, select Produce checks.
-
The system automatically checks for any issues with the selected Payments, and a status displays for each Payment ID. Select or deselect the Ready, Warnings, and Errors checkboxes to show or hide records with those statuses.
-
If there are any invalid Payments, select Remove invalid payments.
-
Select Next.
-
For template settings, select a Bank account and Check template. Choose whether to Test template alignment, select your testing options, then select Next.
-
Edit the check information, including Check date, Next check number, and First check position, then select Produce checks. A check-formatted Microsoft Word document downloads to your computer so you can print directly to your check stock.
For more details, see the Check Writer - Producing Checks learning.